Bills Tech Tips
Call us @ 905-725-3460
Mirror Heads
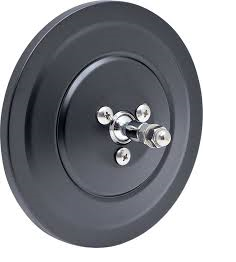
When adjusting these mirror heads for viewing, loosen the 3 set screws ( also insert some grease around stud ) adjust as necessary and retighten.
This prevents scratching the pivot ball w/ socket and future premature rusting.
Wood Bed Floors
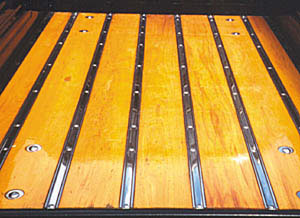
Our experienced wood cutters follow strict guidelines for selecting, checking, sorting and machining the boards to manufacture an excellent product. We select and machine oak bed wood from the finest quality Appalacian red oak lumber. We sand, groove and cut the oak boards to size. Our pine is planed to thickness, grooved and cut to size and should be sanded before finishing. The finish is very important for long-term enjoyment of your bed wood floor. A quality finish maintained over time will protect the wood for years. Applying a durable and attractive finish for your project will require time and effort but the steps are not difficult and do not require expensive equipment.
There is not a single best finish to use since each person’s preferences and resources are different. Local professionals who work with wood products used or installed outdoors may recommend a product suited for your climate. Always select a top quality product and be sure it is designed for outdoor use and provides UV (ultraviolet) protection. Exterior urethane varnish may be applied directly to the bare wood and will provide a natural wood finish with great appearance. Minwax Helmsman or McCluskey’s Man-O-War are two such products. They are easy to apply and dry overnight, although multiple coats are needed. These will generally be suitable for bed wood applications that will rarely see severe weather extremes or direct sun exposure.
A more durable finish may be obtained by using a two stage coating system. The primer or seal coat is a product such as epoxy whose function is to seal the wood and provide great adhesion to the wood surface. The topcoat product will adhere to the first coat and provide strength and damage protection as well as UV protection from deterioration due to sunlight exposure. All clear coatings that provide UV protection need to be recoated periodically, depending on the amount of sunlight exposure. Their UV protection is gradually degraded by exposure to sunlight. Be sure to inspect the finished surface regularly and repair the topcoat material at the first sign of damage or failure.
Penetrating oil finishes that are intended for outdoor or marine use are available and will protect the bed wood. When used by themselves, they will not generally have a shiny appearance, but will provide some protection from deterioration and can be renewed easily, just by cleaning and applying additional coats. Be sure to follow the supplier’s instructions for proper application. Oil furniture finishes are not recommended for bed wood applications as they provide very little protection from damage and may not have good UV absorption to protect the wood.
Here are a few guidelines and suggestions that will help you achieve excellent results.
- The boards must be kept clean. Keep your hands clean and be sure tools and work benches are free of grease and dirt.
- Be sure the bed to frame bolt holes and bedside to bed wood bolt holes are drilled before finishing the wood. Finish the wood before it is installed so that all surfaces are coated.
- Sand the surface with 120 grit and again with 180 or 220 grit sandpaper. Pine should be sanded enough to remove any planers marks. Always use a flat sanding block when sanding oak or pine to prevent cutting away the softer parts of the wood grains. Remove all sanding dust before applying the finish.
- Failure of the finish usually occurs first at a sharp edge of the board or at the ends. Two hints:
- Round over all the sharp edges of the wood to at least 1/16″ radius and more if you can. This will keep the coating from becoming thin on these areas.
- Be sure to saturate the ends of the boards with the coating until they will not absorb any more. We try to put twice as many coats of finish on the ends of the boards as on the surfaces.
- Do not use the paint or varnish right out of the can. Always strain the amount you will need into a clean container and put the lid tightly on the original can. Do not return thinned paintor varnish to the original can.
- Apply a thin coat using a high quality brush or paint spray gun. Be sure to coat all edges and ends of the boards, inside of all drilled holes, as well as the top and bottom surfaces.
- When using a brush, be sure to clean the brush thoroughly between coats. If a small amount of varnish remains in the brush, it will dry and flow into the next coat of varnish leaving the finished surface rough.
- After allowing plenty of time for each coat to dry, sand the surface to be re-coated with 220 grit sandpaper and a sanding block. Sand just enough to remove brush marks or “orange peel”. Be sure to remove all sanding dust before applying the next coat. It is best to do sanding in a separate room to keep the paint room clean and free of sanding particles.
- Re-coat the boards on all surfaces following steps 4 through 7 above to obtain at least 3 full coats covering the boards. Do not sand the boards after the final coat.
- Inspect the wood regularly after installation and repair or refinish any damages that appear over time. The wood will provide a long life if the finish is maintained and repaired as needed.
Published by MAR-K Specialized MFG, Inc.
Ignition Cylinder w/ key removal
To remove your original Chevy ignition lock switch lock cylinder, the original key must be inserted. Be certain the lock cylinder is switched to the Lock and or ACC position and insert the straightened end of a paper clip into the small hole in the ignition lock cylinder-push in against spring-loaded pin. Continue turning the key-cylinder counter clockwise. Jiggle it a few times and the lock cylinder will come out. To install the new unit, simply align with the boss inside of the ignition switch and push it in until it clicks into place.
1960-1966 Signal Switch Installation
Signal switch and bearing failure
Because of the pc design (some exceptions) of the one pc column shaft on these trucks there can be cab load added to the column shaft which in turn is passed on to the signal switch and bearings-this is caused by sagged cab mounts, rusty cab supports, accident damage, etc.
You must unbolt the column support bracket on the engine bay side and the upper bracket in-cab and neutralize the column from the cab so the column shaft has no load on it from the body passed on to the signal switch and bearings.
Installing door seals on 1966-1972 trucks
When installing the door seals over the cab lip PUSH UP (to compress) the seal, do not PULL DOWN (then stretching the material) as you go along. Seals do shrink over a period of time so this allows for this natural process. Secure the seal with some tape so it does not come off as you go along (1967-1972 seals must start on top vent window corner ) allow the glue to dry for a few hours before you close the doors so they are not pulled off the lip (use a black weather-stripping glue). The doors may be difficult to close for a time as the seals need to compress to the size or your door gap and retain this shape, this is normal and expected.

